Don’t let this minor disaster ruin an otherwise perfect carb body!
This Tech Tip is published at The Motorcycle Project …created by vintage Honda wizard Mike Nixon.
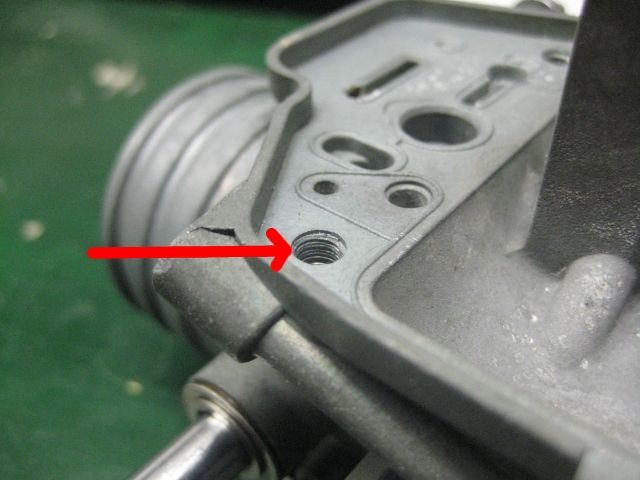
Photo Courtesy of Mike Nixon. All rights reserved.
The threads that retain the float bowls on vintage Honda carburetors are easily ruined by careless mechanics. I get many inquiries about the best way to recover from this calamity.
My preferred method is to use Time-Serts. I find that in this small size (4mm), Time-Serts are superior to Heli-Coils or similar methods.
In fact, I’ve intended for quite a while to write a comprehensive Tech Tech explaining how I do this repair. But, my good friend Nike Nixon beat me to the punch with an outstanding write-up!
If you follow Mike’s excellent instructions, this is a once-and-done lifetime repair. Highly recommended!
How-to article:
Carburetor Thread Repair by Mike Nixon
Remember also – the float bowl gasket does the work of sealing fuel inside the bowl! If you are using high quality float bowl gaskets (like the ones I sell), only minimal torque is needed on these screws.


I appreciate your care for the Honda. Thread inserts help a lot in strengthening the joint.
There is another good way to repair a damaged thread – that is to use the round “V” angled rotary thread file. The angle is 60 degrees similar to all inch, metric and pipe threads. This allows the tool to quickly work on any project, repairing both internal or external damaged threads. They also work great on metals, hardened metals, ceramics, glass and plastics.
a
When repairing a thread, we recommend starting in a good thread using light pressure. Then gradually move into the damaged threads.
Well, I used Helicoils (have used them in my work over 40 years and had good success). A recent set on a fencerow find ’78 GL1000 had ONE correct 4mm screw and an assortment of sheet metal, self-tapping, and wood screws in the other 15 positions. I went ahead and put coils in each hole. Luckily, none were so ruined that the coils could not fully engage. Lots of fun! (I’ll leave it to you as to the condition the rest of the set was in).
As the owner of an old house, I’ve repaired numerous saggy doors when the hinge-screws have stripped out of the holes in the door jambs. To fix it, I jam the hole full of toothpicks and wood glue, wait for it to dry, then I can screw back into it and it holds like new again.
I’ve done a similar thing with stripped-out float-bowl holes. No glue required, but I take 4-6 strands of wire from copper electrical wiring and distribute them evenly around the hole. I then screw down into this… the copper easily accepts the threads as it cuts down into them, and presses firmly into the walls of the holes. Snip off the excess wire and you are good to go. It holds very tight… never had one slip and I can torque it down to spec. It’s cheap. It’s fast/easy to do. It lasts. The only drawback is that next time you take the bowls off you have to do it again… so it’s a semi-permanent fix, but it will get you home. Obviously you don’t want to do this in a bolt-hole that takes a lot of torque, or where bits of wire might fall inside the engine… but it works great for the float bowls.
Warren,
Thank you for your input. We have had this as an on going question as to “how to repair” We truly believe the timesert is the absolute and professional way to repair. Once the insert is installed it is a done issue not having to be addressed again. The integrity of the insert surpasses original cast aluminum body. Again thank you for your input on this subject.
Norton
Randakk’s Customer Service Team
Great article and how-to, but he doesn’t mention any sizes!
http://www.amazon.com/s/ref=nb_sb_ss_c_0_8?url=search-alias%3Dautomotive&field-keywords=timesert&sprefix=timesert%2Caps%2C219
4-mm is the size needed for float bowl screw repair.
By 4mm, are you referring to the M “4”-.7 or the inserts? The M4-.7 timesert kit ( http://www.amazon.com/TIME-SERT-Metric-Thread-Repair-1407/dp/B001JK44HK/ref=sr_1_1?s=automotive&ie=UTF8&qid=1422428217&sr=1-1&keywords=timesert+M4#productDetails ) comes with 4.3mm inserts. Does that mean I have to separately buy 4mm inserts, or do the inserts that come with the kit the right ones? Haha sorry, I’m just a bit confused
You need “M4 inserts” which are correctly sized to accept M4 screws. That is the sizing convention.
That kit has what you need.
This is incredibly helpful. Thank you!!