You might consider this item. I show how to rebuild the GL1000 petcock in Randakk’s GL1000 Carb Rebuild Video
Randakk’s proprietary petcock rebuild kits are included in GL1000 and GL1100 Master Carb Overhaul Kits and also available separately.
Better than OEM quality, our Petcock Repair Kits are designed to work with both the rebuildable (’75-’76) and “non-rebuildable” (’77-’79) Honda GL1000 petcocks. They are a simple direct replacement for the ’75-’76 “early” petcocks.
All Randakk repair components are made of genuine Viton® for superior resistance to the components of modern gasoline.
![]()
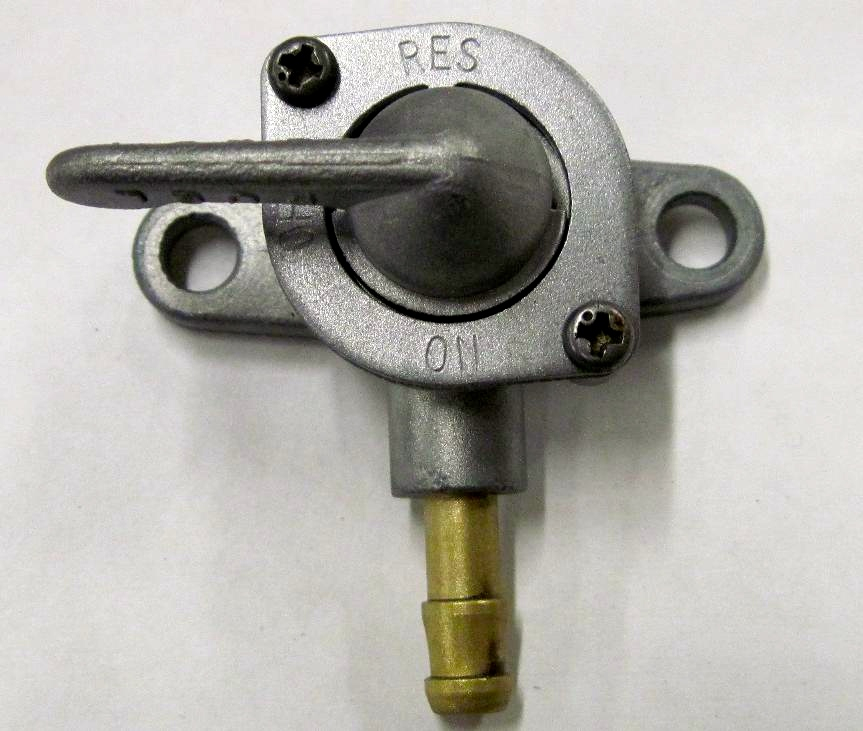
’75-’76 “Early” Petcocks (and LTD):
Assuming your fuel tank is empty (it should be!), this will be a simple 30 minute install on ’75-’76 petcocks. These early petcocks are assembled with 2 – 3 mm screws and are very easy to rebuild.
1. Drain or siphon fuel from gas tank. Obviously, do this outdoors for safety.
2. If you opt for the drain method, there is a drain plug near the rear brake master cylinder, behind the right side cover.
3. Fashion a shallow “funnel” cut from a 1/2 gallon plastic milk carton to route the fuel away from the drain hole to a suitably large catch can.
4. To avoid “rounding” this drain plug, you should carefully use a 17 mm 6 point box-end socket or wrench to remove. Don’t lose the special sealing washer behind the plug.
5. Important: once the tank has drained, put a light coating of Permatex Aviation Form-A-Gasket sealant on the threads, then re-install the plug and washer. This plug has very coarse threads. This is the only sealant I can recommend for this application. If you don’t use this sealant, I guarantee you will have a fuel leak. This particular sealant is impervious to gasoline…others aren’t! The sealing washer by itself is insufficient. Don’t over-torque the bolt!
6. Disconnect the fuel hose at the petcock.
7. Remove the 2 – 3 mm screws which hold the retainer plate while the petcock is still attached to the tank. This is much easier and safer than attempting to hold the petcock in a vise.
8. Remove the wavy “spring” and selector lever.
9. Remove the old petcock disk seal.
10. Remove the 2 – 6 mm screws which attach the petcock to the tank.
11. Remove the 2 seals from the back of the petcock.
12. Clean all metal parts in carb cleaner.
13. Wash all metal parts in warm soapy water.
14. Verify with compressed air that all parts are dry and clear.
15. Since I’m anal retentive, I like to lightly polish the back of the selector lever (the surface that rubs on the petcock disk seal) as well as the front surface that contacts the wavy spring I use crocus cloth lubricated with WD-40. Make sure there are no burrs on the wavy spring either.
16. Re-wash and dry all parts.
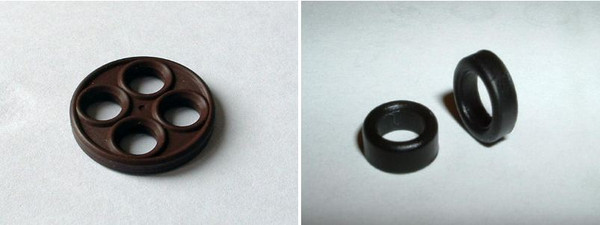
17. Install the new petcock sealing disk in the petcock body. Note: there is no “wrong” way to do this. All 4 holes are identical and each side is a mirror image of the other.
18. Very lightly lubricate the selector lever and wavy spring with Vaseline. In use, the rubber disk is lubricated with gasoline. The Vaseline. will protect the rubber while it’s in a “dry” state.
19. Place the lever into position.
20. Place the wavy spring into position on top of the lever.
21. Place the retainer plate over the spring.
22. Put some blue (medium) Loc-Tite on the 2 – 3 mm screws.
23. Using a very small phillips screwdriver, carefully and evenly tighten the 2 – 3 mm screws. DO NOT OVERTIGHTEN. The petcock body is made of very soft alloy and these small threads will easily strip. Remember, the sealing disk and the wavy spring are the responsible agents for making a fuel-tight seal. These 2 screws merely hold everything in place.
24. Install the 2 special fuel seals provided in my kit into the back of the petcock. Note: the rounded radius of each seal should be oriented toward the fuel tank. Don’t use any sealants on these seals.
25. Reinstall the petcock to the tank with the 2 – 6 mm screws. I use a small amount of blue (medium) Loc-Tite on these screws.
26. Reconnect fuel hose at petcock.
27. Refill your fuel tank.
28. Ride and inspect for leaks.
’77-’79 “Later” GL1000 Petcocks and ’80-’83 GL1100 Petcocks:
(’79-’81 CBX Petcock rebuild process is similar)
The later petcocks (’77 and later) are “riveted” together with stakes and the retainer plate is rotated 90 degrees. Otherwise, the critical internal dimensions are the same. My rebuild kit will work perfectly with these petcocks, but you will have to drill out the 2 rivets and tap threads for 3 mm screws. Here’s how…
- Follow steps 1 – 11 above (omitting #7-9).
- Holding the petcock carefully in a vise with “soft” jaws, carefully drill holes all the way through the center of the 2 rivets which attach the retainer plate. Use a #39 drill bit. The correct #39 drill bit is equivalent to 2.5 mm or 0.098425 inches in diameter. Allow the bit to drill all the way through and exit on the back side of the petcock body. Make sure you drill bit is oriented perfectly “square” to the petcock body and centered in the rivet head.
- Remove the remnants of the rivet head. You could use a grinding wheel, file or side-cutting pliers, but this would probably ruin the surface finish of the plate. If you care about cosmetic issues, it’s better to use a larger sized drill bit (nearly as large as the rivet head) to carefully remove the rivet head remnants. Be very careful not to cut into the petcock body or enlarge the hole in the retainer plate. Let me repeat: BE VERY CAREFUL. If you damage these parts, you will need to buy a new petcock or get another salvage unit. The individual pieces are not available from Honda.
- Once the retainer plate is free, remove all internal petcock parts per above.
- Using a proper tap, carefully cut 3 mm, 0.5 pitch threads. The drill size detailed in step #2 above creates the correctly sized pilot hole for tapping 3 mm threads. Take your time and use lubricating oil. Back out frequently to clear shavings from the tap. Remember, you are cutting very tiny threads in very soft material, so be quite light with all your forces.
- Clean all metal parts in carb cleaner.
- Wash all metal parts in warm soapy water.
- Verify with compressed air that all parts are dry and clear.
- Since I’m anal retentive, I like to lightly polish the back of the selector lever (the surface that rubs on the petcock disk seal) as well as the front surface that contacts the wavy spring I use crocus cloth lubricated with WD-40. Make sure there are no burrs on the wavy spring either.
- Re-wash and dry all parts.
- Install the new petcock sealing disk in the petcock body. Note: there is no “wrong” way to do this. All 4 holes are identical and each side is a mirror image of the other.
- Very lightly lubricate the selector lever and wavy spring with Vaseline. In use, the rubber disk is lubricated with gasoline. The Vaseline. Will protect the rubber while it’s in a “dry” state.
- Place the lever into position.
- Place the wavy spring into position on top of the lever.
- Place the retainer plate over the spring.
- Source a pair of 3 mm, 0.5 pitch screws. These need to be about 6 mm long.. available at nearly every Ace Hardware or True Value hardware store. Also online here at MacMaster-Carr (search on part #94387A206).
- Put some blue (medium) Loc-Tite on the 2 – 3 mm screws.
- Using a very small Phillips screwdriver, carefully and evenly tighten the 2 – 3 mm screws. DO NOT OVERTIGHTEN. The petcock body is made of very soft alloy and these small threads will easily strip. Remember, the sealing disk and the wavy spring are the responsible agents for making a fuel-tight seal. These 2 screws merely hold everything in place.
- Install the 2 special fuel seals provided in my kit into the back of the petcock. Note: the rounded radius of each seal should be oriented toward the fuel tank. Don’t use any sealants on these seals.
- Reinstall the petcock to the tank with the 2 – 6 mm screws. I use a small amount of blue (medium) Loc-Tite on these screws.
- Reconnect fuel hose at petcock.
- Refill your fuel tank.
- Ride and inspect for leaks.
Note: I also supply petcock rebuild kits for the Honda GL1500.


Hi, I also have a plastic washer in my Petcock but it flew out when taking apart. Where does this washer go? Thanks!
On the ‘81 CBX there is a center coil spring instead of the wavy spring. After drilling rivets take care because pressure will have a “jack-in-the-box” effect and you will be looking on the floor for parts…don’t ask how I know.
As always, straight up, no BS, ACCURATE how to info…..can’t go wrong !!
should I leave the bit of rivet head on the main petcock piece for the retainer plate to slide onto, or shave them down flush?
Not critical, but “flush” is preferred.
rebuilt with kit, several times. no matter what i do fuel weeps / leaks from the inner diameter, where the lever extends out. I read your note abut essentially honing the back side surface and will do. However what else?
Possibilities:
1. Parts assembled in wrong sequence
2. Parts omitted …especially “wavy” washer
3. Burrs on parts
4. Petcock metal parts damaged or worn out
Randall,
Under “’75-’76 “Early” Petcocks (and LTD)” above, you refer to the ‘sealing washer’ that goes on the fuel tank drain bolt. Question: Is that washer an aluminum crush washer or something else? What can be used to replace it? Thank you.
The OEM item is hard aluminum. It doesn’t “crush” much, so that’s why the special sealant is recommended. I’ve never used anything but the OEM item. Since they are so hard, they never wear out.