You might consider this item: Randakk’s GL1000 Carb Rebuild Video
Allow me a little soapbox time. Early GL1000s are routinely criticized for having poor carburetion. The criticism has been repeated so often by so many that it has become accepted as fact. Here is my contrarian view: the early GL1000s have great carburetion set-ups! My personal ’76 GL1000 show bike has flawless, near-linear carburetion…rheostat-like throttle response, no flat spots, starts easily, warms up fast enough and has a decent idle. My carbs are completely stock except for a few minor tweaks I make on all the carbs I service. I’ve owned and ridden many bikes. I believe the stock set-up on a GL1000, properly maintained and tuned delivers results as good as you can reasonably expect on a 4 cylinder, 4 carb bike of this vintage with this level of performance. In fact, GL1000 carburetion is easy to sort compared to some of the demonic setups I’ve encountered (my Weber-equipped Ducati 750 Nuevo Sport wins the prize as the worst I’ve ever personally grappled with).
The single carb conversion units which are available for GL1000s appear to be well engineered. However, my view is that this is an unnecessary “improvement.” I’m convinced that if anyone bothered to do a dyno test, the stock set-up would produce more peak power and torque with flatter curves. Automotive-type carbs ( e.g., Holley) aren’t normally expected to perform over the wide rpm range associated with motorcycle engines. Typically, they also don’t tolerate much departure from the steady vertical operation. Aggressive sustained cornering can become a problem with these carbs. A well-tuned, stock GL1000 will easily pull to red-line in 4th gear (being over-geared, fifth is another matter). I can’t personally verify, but some claim single carb conversions “run out of steam” on the top end.
Some other points to keep in mind:
1975-1977 GL1000s are blessed with a Superbike-class engine. Although riders tend to think of them as “torquey” since there’s plenty of low-end grunts and a heavy flywheel effect, it’s actually a rather “peaky” engine. In fact, the torque peak is up around 6500 RPMs in typical Honda fashion for performance engines from this era. Also, the cam specs (duration, lift and overlap) are fairly radical. Part of the issue with the GL1000 idle is the slightly “lumpy” cam that causes semi-irregular cylinder filling/firing at low speeds. Not as bad as a AA fuel dragster but very noticeable to a good ear. It just seems to be a fact that flat “boxer” engines like this (also Porsche, Subaru, VW, BMW, etc.) generally don’t sound sweet at idle. It’s unreasonable to expect a peaky engine, with a semi-radical cam to have a perfect idle. GL1000s will tolerate a great deal of low speed “lugging” before they complain…usually by fouling plugs. Personally, I make a conscious effort not to spend much time below 3,000 RPMs.
GL1000s also have rather long intake runners. This is a good idea to increase torque especially given the cam timing. But, the penalty is longer warm-up times. Once you understand the design intention (superbike performance), you have to reconcile this with the inspired and semi-illogical combination with a touring geometry frame and running gear. Personally, I love this quirky stealth combination, but your expectations have to be reasonable.
If your carbs are clean (I mean REALLY), all your vacuum hoses are good, your air-cut off valve fresh, choke linkage free, butterfly pivots not worn out, floats set and operating correctly, vacuum pistons free, air and fuel filters fresh and you’ve synchronized AFTER all other tune-up issues are perfect, you should have excellent results. The first point bears amplification. Cleaning a set of GL1000 carbs is straightforward, but tedious and time consuming (takes me about 6 hours total). Most dealer personnel don’t have the aptitude or patience required to do a proper job. I’ve cleaned many carbs that were supposedly just cleaned by someone else and found lots of grunge in obvious places. You don’t necessarily have to split the carbs from the plenum, but everything else has to come apart. For example, if you don’t remove ALL the jets and emulsion tubes, you’re wasting your time. Also, don’t go to all the work of disassembly and cleaning without using new o-rings and blanking plugs when you reassemble. The action of the vacuum slides must be perfect. Generally, this means you must not only clean the slides and bores but also CAREFULLY polish with crocus cloth (don’t damage the locating bore pins!).
As mentioned previously, Robert Overby wrote a very interesting article titled “Improving Your GL1000’s Performance” which appeared in Wing World in the June 1995 issue.
In addition to the ignition quirks, he addressed another common problem with these bikes: the “off-idle” flat spot on ’75-’77 models. These bikes have slightly different carb jetting, but they are all rather lean on the idle circuit. This makes them require excess choking (which wouldn’t be so bad if the fast idle ramp was curved better). Worse, this typically results in a flat spot just above idle that most riders overcome by revving the engine slightly and slipping the clutch to move from rest. Once you’ve become accustomed to this compensation, you don’t tend to notice the minor annoyance.
However, there is an easy fix. Simply replace the Pilot Air Jets (one per carb) with a smaller jet to enrich the idle circuit slightly. ’75 and ’77 models use stock Keihin Pilot Air Jets – size #110. All ’76 models use a size #115. Robert recommends a replacement jet – size #98. The Honda part number for this replacement jet is 99164-601-0980. The good news is that these can easily be replaced without carb removal. They are mounted in the brass elbow on the carb end of the 4 short vacuum hoses coming from the carb plenum. The bad news is that these replacement jets were discontinued by Honda in 1996!
Here are 3 solutions:
1. Cheap, but tedious: Remove the stock pilot air jets, solder the orifice closed and re-drill an opening using a size #62 micro drill bit which is approx. 0.038″ (for reference, a stock #110 jet is about a #57 micro drill size = 0.043″ …the reduction in jet size is only about 11.6%). Replace the altered jets and you’re done. Micro drill bits are available from a variety of sources that sell Dremel accessories. One good source for micro bits is Widget Supply: https://www.widgetsupply.com/
Customer Tom Stark recently suggested this improved technique for soldering and drilling these jets. His method preserves the overall orifice length quite easily.
“I use a 1/8 pop rivet and grind the end flat. I stick that in a vise and put the air jet on top of it. A small torch would work best, but I used a regular big propane torch, heated it up, then used very thin solder and was able to fill the hole, leaving the jet the same length as stock. Takes a few seconds each. Then to drill I set up one elbow in my Bridgeport and whack them all out, only have to center for the first. A drill press would also clearly work.”
Tom Stark
Tom Stark’s Method for Soldering / Drilling Air Jets
2. If you’ve recently bought carb rebuild kits, you probably have some leftover #60 secondary air jets. These are from the same jet “family” and can be drilled out with a size #62 micro drill per above.
3. Easy, but costs about $25: Secure 4 replacement jets from SUDCO with Keihin Part #99101-124-100 (SUDCO part # is 99101-ZF5-1000). These have the right size orifice for correction (size #100), but they aren’t sized to screw into the elbow. Instead, here’s what you do. Remove the stock jets (you won’t be using them!). Then insert the jets from SUDCO into the end of the vacuum tube nearest the elbow. Push it in exactly 5/8″ using a drift or piece of dowel. Make sure the slotted end is oriented away from the elbow. Re-attach the vacuum tube and you’re done. By the way, I recommend you replace these vacuum hoses while you’re at it. The correct size vacuum tubing is 5.3 mm id (good substitute is 7/32″ id). While you’re messing with vacuum hoses, you might as well replace the hose to the air cut-off valve. This hose is smaller…3.5 mm id (good substitute is 5/32″ id). This mod REQUIRES that you keep the clamps to secure the vacuum hoses. Here’s a link to SUDCO: https://www.sudco.com/
All 3 methods work great!
Note: This mod is for ’75-’77 GL1000s…not required or necessary for later bikes.
Additional Note dated 5/22/03: Recently, I discovered a small difference here. In ’76, Honda slightly enlarged the 3 idle by-pass ports (located under the round aluminum “puck”). In ’77, Honda reverted back to the original size for these by-pass ports. This explains why stock ’75 and ’77 carbs had #110 idle air jets while ’76 carbs had #115 idle jets (more air was needed to balance the additional fuel passing through the slightly larger by-pass openings).
I’ve discovered that Robert Overby’s recommendations (detailed above) regarding changing to #098 idle air jets is perfect for ’75 and ’77 bikes. However, on ’76 bikes it’s a bit more correction than optimal.
The solution for ’76 carbs is to use #105 idle air jets. Basically, you can make these following method #1 or #2 above, but use a #59 micro drill bit instead of a #62 (I know it’s confusing, but micro drills get bigger as the micro drill number gets smaller). This is the set-up I run in my own ’76 show bike.
By the way, I live at about 350 feet above sea level. If you ride extensively at high altitude (above 6000 feet) I would forego this “off-idle” mod.
If you want to find the best selection online for motorcycle parts, visit our stores below:
www.DimeCityCycles.com | www.Z1Enterprises.com | www.Randakks.com | www.MikesXS.net


Hi , could Mr Randakk please add a list with bike year and carb number and recommended jet or washer mods
Like 1976 758a carb and suggested mods …………………………..
Mainly because manufactured date and registered date in some country’s can be completely different so mods to that carb number would be better than saying 75 and 77 need this but on the 76 they change the ……….
Cheers.
This off idle stumble I fixed and all you have to do is raise the needle about a 32nd 2 of the smallest washers that will fit in the hole where the fixed on sits. Then check the length of each pin height and that it. O to polish the slide and all the moving parts around the slide just use aluminum foil that’s all
Good evening All,
I come from the island of Malta and do not know of any other Vintage Gold Wing owners.
I need to know the float level setting of the 755B carburetors as I cannot find the information anywhere. My Gold Wing is a 1976 model.
Answer here: http://www.randakksblog.com/floats-101/
and here: https://www.randakks.com/randakks-honda-gl1000-carb-rebuild-video.html
Thanks Randakk for sharing your knowledge, this were great lessons
I am living in Europe and own 2 GL1000 K3. The “off idle solution” works very well on the bike I modified. My carburateurs have the number 755B (idle airjet 110, motor GL2) and after a lot of work, on them the last step was to modify the air intake jet to get a better performance just above idle. I noticed a surprising performance improvement after that. I modified a spare set of 60 jets, by boring them langer with a microdrill to 0,95 mm and replaced the 110 airjets
Now I am experiences the next positive changes is behavoir:
1) The motor is picking up a tremendous lot better from idle , (I am not afraid anymore of hairpin corners in the mountains)
2) It uses less choke to cold start
3) It keeps a bit cooler, althoug warming up still takes 10-15 kilometer
4) It is smooter and has better response running between 1500-2500 rpm.
5) The idle rpm did not change but the motor is running a lot smooter at idle, the rpm needle stands very still which i almost never have seen. Most GL1000 needles dance a bit at idle
Its my first experience, of such a great improvement on a GL1000 with such minor changes, I was compleetly blown away by the endresult.
The only thing what did not change, is a hik up when you give a bit more gas at once. its like the motor is overeating itself.
No idea what is happening then.
Thanks Rene
The trick of using a pop-rivet shank to plug and hold the jet for soldering is perfect. Also, for those that need, the metric equivalent to the #62 drill is 1mm (.0393″)and should work as most small bit measure a tad under (my 1mm measures .0386″)
I’m cleaning up a 76 carb set and need clarity on the idle air jet mod.I have a micro drill that is 0.04″ in diameter. (My caliper only goes to two decimal places when I measure the drill diameter). It’s bigger than the orifice in the 115 jet. Can’t I just drill out the jet without filling with solder first?
I recommend you use micro drills that are marked with the standard sizes. Those are the sizes I reference. Otherwise, you will need a micrometer that is sized in the metric convention. For example, a #098 jet is actually 0.98 mm.
My calipers can also measure in mm but I ordered #59 drills to be sure. Thanks for your advice.
Hi, i have troubleshooting my goldwing 1977 many many hours. It sems ok in neutral and when i rev up the engine. But when i drive, its like it goes on 2-3 cylinders, full trottle in 1 gear, no power. But when i come up to about 5000 rpm, it fels like all power is there. I have installed the dyna ignition, new coils, wires plugs. Cleaned carbs, adjust floats, tested air screws at 1.5, 2.0, 2.5 turns out. Set ignition timing. Do you have any idea ?! I am totaly stuck right now, please help me !
You have a combination of small ignition and carb issues.
I would investigate:
1. Sticky ignition advancer
2. Sticky CV slides
3. Blocked idle fuel circuits
4. Weak battery / charging system
I have now tested a lot of things. Ignition advancer, moves smooth. As the hole ignition system is new and great spark, and yesterday i saw that the plugs on left side turn black and dry, after drivïng a while. The right plugs seems ok. What in the carbs can do like this? I think its clear now that the problem is a 100% carb related?
Sorry. Your report is not sufficient to offer a definitive assessment. Generally, left /right differences in plug color indicates mixture imbalances. There are many causes such as: incorrect jets, dirty jets, float problems, exhaust blockages, vacuum leaks, sync problems, etc. etc.
I am enjoying all of the helpful little hints and tricks shown here. But, I have a 79 GL1000 that I have had since new. Not big miles on it – just passed 70,000. Had a head gasket fail a couple of years ago and drownded it with coolant. I spent a lot of last summer doing a complete makeover on my old baby. I could have bought a much newer replacement and scrapped this one for what I spent. I am happy with the result except the typical complaint of stumble at off idle and at cruise under almost no throttle. I did install the Randakks kits and was maticulous about details and plenty of time spent. Sure would like some advice on this. I did not look too close at the idle air jets- is there a jetting issue here on the newer than 77 models? One other concern I am surprised that hasnt been brought up is the plastic caps on the air needle valve caps. I had mine off and put a little water on top and blew some shop air from the bottom and had bubbles like crazy. I found some small chrome plastic caps- filled them with JB weld and got them sealed up. In my mind this would have to have a major balance effect. Thanks for listening– I’m all ears.
No air jet “glitch” fix is needed on ’78-’79 models. You probably have a minor ignition and/or carb issue issue responsible for that symptom. Study the Tech Tips for possibilities …there are literally dozens. Here’s how I repair carb caps: http://www.randakksblog.com/gl1000-cv-slide-cap-variations/
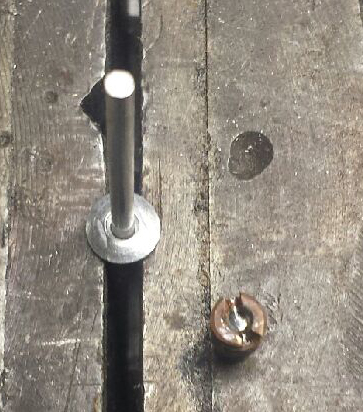
on a 77 gl1000 carb in the area of the float there is an aluminum disc appr. 3/8 w and 1,8 thick. if removed you will find 3 small holes . what is this . thanks bill
That is the so-called “puck.” It’s an access port to allow cleaning and to cover an access area necessay for manufacturing the carbs.
See: http://randakks.com/collections/honda-gl1000/products/gl1000-carb-pucks-included-in-gl1000-master-kit
Randall, in the second paragraph you say
Typically, they also don’t tolerate much departure from steady vertical operation. Aggressive sustained cornering can become a problem with these carbs.
Actually, when a bike corners, the fuel level looks to the carb like the bike is upright because of centrifugal force. The forces which require the bike to not topple are the same as those which keep the fuel level relative to the carb bowl. When in a cornering car, however, the fuel will move to the outside of the bowl.
So, while the rest of your argument may be correct, I think this part has a problem.
I undertand your remark and I agree (to a point) with the valid mention of centrifugal force. That’s the physics that allows the fuel pump tilt switch we designed to operate correctly and “know” difference between cornering and an actual tip-over.
Having said that, automobile-type carbs simply don’t perform well when subjected to long sustained tilts combined with rapid violent cyclical side-to-side inclinations that are routine on a bike when ridden aggressively. Such extreme ranges of “tilt” are never seen in a car.
On the other hand, the engineers who design motorcycle carbs understand the routine, extreme departures from vertical and take steps to mitigate the adverse effects. These include specific design features in the float bowls and main jet “pickups.”