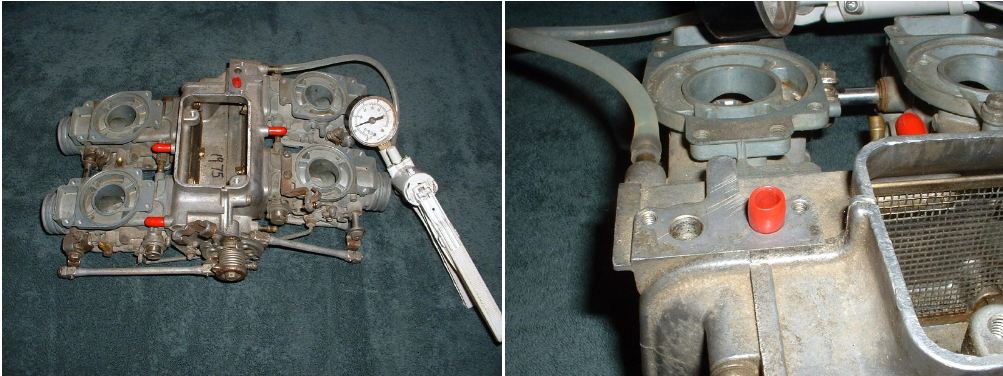
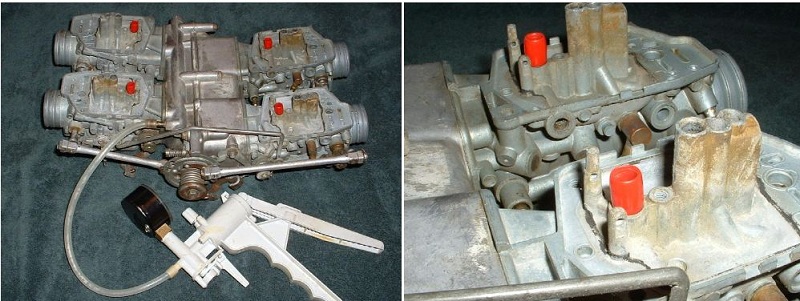
This Tech Tip is an abbreviated version of material I show in detail in the GL1000 Carb Rebuilding video. The pictures are mostly self-explanatory.
I like to do each of these tests twice: once before the rebuild begins to help me understand what I’m likely to find inside the carbs and again when the rebuild is nearing completion to check the work.
These tests are highly recommended. More than one customer has omitted seals or made other mistakes during a rebuild. These tests can save your bacon and help you avoid the time-consuming hassle of having to do the carb installation twice!
GL1000 Plenum AIR Circuit Testing Method
For the air circuits, the testing validates the function of the central plenum seal as well as the carb plenum casting halves. Rather surprisingly, this ragged old rack of carbs actually passed the air circuit testing.
Use the vacuum side of the hand held pump. Notice that the rearmost hole in the plenum for air cutoff valve must be blocked with a plug for this test. The vacuum pump is connected to any one of the hose barbs for the short external idle air hoses. The other 3 idle air hose barbs are capped for the testing as shown.
Good carbs should hold 20+” of vacuum indefinitely, but several minutes is a sufficient testing threshold. This test does not reveal the cause of a “failed” test. Internal inspection is required to determine that.
GL1000 Plenum FUEL Circuit Testing Method
For the fuel circuits, the testing validates the function of the central plenum seal, the carb-to-plenum fuel seals and the carb plenum casting halves. Not surprisingly, this rack of carbs failed the fuel circuit testing miserably. This is most often the case on carbs that have been out of service for a long time. Later internal inspection revealed that these carbs had never been split since they were manufactured. The original Honda carb-to-plenum fuel seals had hardened, shrunk and split.
Again, use the vacuum side of the hand held pump for this test. Notice that all 4 openings for the float valve assemblies must be blocked with plugs for this test. The vacuum pump is connected to the fuel hose barb as shown.
Good carbs should hold 20+” of vacuum indefinitely, but several minutes is a sufficient testing threshold. This test does not reveal the cause of a “failed” test. Internal inspection is required to determine that.
The procedure above is specific to GL1000 carbs, but similar methods are easy to devise for GL1100 carbs.


Is there supposed to be some kind of pipe between the plenum halves for fuel? Or is it just those funky o-rings keeping the two together?
Dumb question? What happens when these plenum seals go bad? You are bypassing the air box and in turn running leaner? Or these seals are integral to the engine running period?
A failed plenum gasket can cause air and/or fuel leaks.
Failed plenum FUEL seals cause fuel leaks which can be visible external leaks or internal leaks into the plenum (usually unnoticed).
Failed carb-to-plenum AIR orings cause air leaks and yes this can cause a minor lean condition for the affected cylinder(s).
I tried this test on a set of ’75s I recently got fuel/plenum seals for (from you), but I had poor plugs and dismissed my results (my mistake). I see your plugs serve double duty as caps. What are you using for the plugs/caps?
Those are available at merchandisers like Carquest, NAPA, AutoZone, etc. They are simply vacuum caps …often sold in a pack with a variety of useful sizes. The caps can also be used as plugs as shown.
Thanks
I got several sizes but the ones that serve both as caps and plugs are the 3/16.
Perfect!