You might consider this item ..synchronization is shown: Randakk’s GL1000 Carb Rebuild Video
Proper carb synchronization is the key to a sweet running bike. When carb sync is out of whack, you can have a poor idle, poor off-idle response, “hanging” throttle and lazy return to idle. You can even suffer from fouled plugs if one or more throttle butterflies are opening early, thereby partially activating the carb’s progression circuitry. Very small adjustments will have a major impact on idle smoothness!
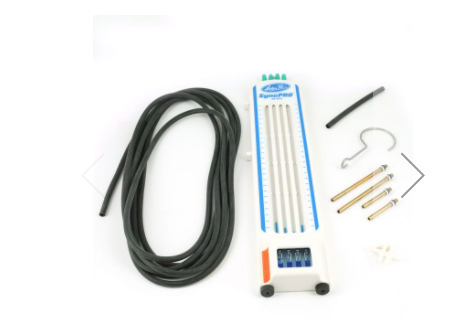
Use a high quality “4-gang” set of gauges to synchronize. It is important that they be accurately matched to each other or your efforts will be wasted. The procedure detailed below is essentially the same for “sticks” or gauges.
Caution: If you choose to use mercury “sticks,” be aware that mercury is an extremely toxic substance. Follow the instructions provided with your synchronization kit to the letter with regard to mercury hazards. If you are not confident in your ability to perform this work accurately and safely, have a professional motorcycle mechanic do this work for you.
- Imperative – all other tune-up issues must be in order before you synchronize. Note: You should do a valve adjust and compression test (in that order!) before doing ANY ignition or carb tuning. GL1000s will run poorly when valve lash is not set exactly to spec. Fortunately, valve lash stays “in spec” for a long time once properly set. Note: Valve timing on a GL1000 is critical. Verify that your cambelts are installed correctly. The “match marks” on the flywheel and the cam pulleys must align perfectly. The GL1000 is an interference design engine. If your belts are off by 1 tooth, your engine will run like crap. If your belts are off by 2 or more teeth, serious engine damage will occur immediately. Note: Keep in mind that all ignition issues must be perfect before carb work is undertaken. This includes coils, plug wires, plug caps, spark plugs, ballast resistors, breaker points, condenser, ignition advance mechanism, ignition switch, kill switch, main fuse, battery, and all associated wiring harness components. Note: Ignition performance and timing is critical on GL1000s! Ignition problems often mimic carb problems to an untrained ear. Click here for helpful information on setting points and ignition timing properly.
- Imperative – Your bike must be outside for this procedure to avoid a fire hazard.
- Be sure you an adequate supply of FRESH FUEL in the tank (at least 2 gallons) so you won’t have to use the “Reserve” setting during initial startup
- Your bike must be fully warmed up before you begin. A for a 10-15 minute ride around the neighborhood should suffice.
- The bike should be parked on a level driveway using the centerstand.
- Place a large fan in front of the bike blowing on “High” toward the bike. This prevents overheating. Also, your goal is to complete this synchronization expeditiously enough so that the bike’s radiator fan does not come on. It’s not a tragedy if it does, but it introduces an unnecessary variable by reducing the idle speed somewhat.
- Connect the vacuum gauges or mercury “sticks” according to the manufacturers’ instructions. I use a simple set of 4 mercury “sticks” as these are inexpensive and quite accurate. Be very careful handling the “sticks” as mercury is very toxic. Also, make sure you install the flow restrictors into the tubing per the instructions which come with your “sticks.”
- You will be attaching the 4 hoses to 5 mm brass ports you install into the sides of the intakes after removing the small screws. Hang the sticks from the handlebar so they are secure, vertical and easy to read. You may have to extend 2 of the hoses to reach the far side of the bike. Don’t allow any kinks in the hoses.
- Mark sure the fuel petcock is turned to “ON.”
- Start the engine. DO NOT REV THE ENGINE ABOVE 3500 RPMs… THERE IS A DANGER OF SUCKING MERCURY INTO THE ENGINE IF YOU DO. IF THIS HAPPENS, DISCONTINUE THE SYNCHRONIZATION PROCESS AND RIDE THE BIKE FOR ONE MILE OR MORE TO PURGE THE MERCURY FROM THE ENGINE. NO DAMAGE TO THE ENGINE WILL OCCUR IF THIS PURGE PROCEDURE IS FOLLOWED.
- Adjust idle speed (if necessary) to 1000 RPMs using a curb idle screw.
- Check gauges or “sticks.” According to the factory specs, all 4 cylinders should be within 50 mm Hg (2 inches Hg) of each other. Actually, a variance of 2 inches is fairly out of whack in my opinion. I aim for a max difference of 1/2″ between the cylinders…1/4″ is better. A low reading means that the cylinder’s throttle plate is too “open.” A high reading means that the cylinder’s throttle plate is too “closed.”
- If the readings are out of spec, adjust as follows using the 3 sets of adjusters:

Adjuster A – between carb #1 and carb #3 on the right side (balances carb #1 and #3 to each other)

Adjuster B – between carb #2 and carb #4 on the left side (balances carb #2 and #4 to each other)
Adjuster C – the one to the right of carb #4 (left rear carb…this screw balances left pair to right pair).
14. I use a “combo” tool which allows unlocking of the locknut, adjustment of the balancing screw and re-locking the lock-nut in one step. This tool is available from Motion Pro. It’s almost as easy to use an 8 mm wrench and plain flat screwdriver.

- Loosen the locknut at Adjuster A. Turn the screw to balance carb #1 and carb #3 on the right side. Adjustment is correct when both cylinders show approximately the same reading. Carefully, tighten the locknut while holding the screw stationary. Don’t over-tighten! Re-check readings on gauges or “sticks.” Repeat as necessary if the readings have drifted.
- Loosen the locknut at Adjuster B. Turn the screw to balance carb #2 and carb #4 on the left side. Adjustment is correct when both cylinders show approximately the same reading. Carefully, tighten the locknut while holding the screw stationary. Don’t over-tighten! Recheck readings on gauges or “sticks.” Repeat as necessary if the readings have drifted.
- Loosen the locknut at Adjuster C. Turn the screw to balance left carb pair with right carb pair. Adjustment is correct when both pairs show approximately the same reading. Carefully, tighten the locknut while holding the screw stationary. Don’t over-tighten! Recheck readings on gauges or “sticks.” All 4 cylinders should now show the same reading. Repeat as necessary if the readings have drifted.
- Note: Don’t get too anal here. Perfection is not possible. I strive for a tolerance of 1/4 – 1/2″ Hg between all 4 cylinders. You can “chase” this all day and not get much closer due to the inherent “slop” in the linkage design.
- Check idle speed and re-adjust if necessary to 1000 RPMs.
- I like to do one additional check – SLOWLY raise the engine speed to 3000 RPMs and observe the gauge readings. The readings should still be closely grouped. If not, you may have carb, ignition, compression or vacuum problems. Mis-matched main jets or jet needles can cause this problem. Other causes are dirty air filters, worn carburetor bodies or throttle slides and restrictions in the exhaust system. It can also be simple mechanical problems (“slop”) with the linkage. In any case, if the readings fall badly out of spec at 3000 RPMs but are good at idle, you may wish to investigate the cause. Some folks recommend synchronizing at 3000 RPMs for better cruise performance but I do not. It’s hard to live with a poor idle!
- Remove the gauges or “sticks.”
- Replace the small screws in the intakes which were removed in step #8.
- Road Test.
- Recheck for leaks.
- Miller Time!


Ok so my bike starts up an idles at 1000 rpm for just a couple of minutes then it jumps up to 3k an even past that im pretty sure carbs are out of sync an I’ve tried the idle screw to lower rpms but it doesn’t do anything is it ok to sync carbs wen there idling so high or do I have a vaccuum leak somehere
79 OEM carb stack on 75 GL1000 engine. About to sync carbs any tips to on what to favor, richer vs leaner idle mixture screw, 79 is 2 turns 75 calls for less? All other pre-requisites have been performed, timing, compression test, valve lash set to 75 OEM specs. Currently starts, runs, comes up to temp with zero issues, warm idles at 1100 ish.
Excellent advice from Randakk! I have one question though, Would slightly bad Felt Seals cause my RPM’s to hang at 3,000 rpm, or to fall down slowly after waiting a minute? ’76 Gl1,000, I’ve installed you’re carb kit, and have checked and gone through EVERY thing else on this bike, my assumption is that it has to be those Felt Seals sucking a tiny bit of air maybe? Because if I slightly pull on either of the linkage rods going to either side of the carbs to force them to close barely, then my RPM’s will drop down to the 950 range like they are supposed to. Please let me know if I’m probably right or not haha….thanks in advance
i would check for cable hang, pull push pull cables off and see if still hangs idle and reacts when you manually tug on throttle linkage to close.
Thank you. Great tech tips. I followed tips here and did sync on 1978 GL1000 I bought a month ago. Did valves (they were tight) and checked timing (it was good) then did sync. Previous owner had carbs rebuilt by Pistol Pete. But when I bought it bike ran rough.
Motor runs great now. I love that engine. Just did 1600+ round trip from Alabama to South Florida on the bike. (I haven’t listed all the maintenance I did or parts I bought from Rankakk’s Cycle shop).
Thanks for this website.
Should We go ahead and get the Honda Civic?
i would get it if thats what you would like to get Well gosh darn it that’s as effective as any reason I
can think of
hi
I have a spare set of Goldwing gl1000 1975 type 755a that I want pistol pete to recondition…..set up and send back to me in Australia…….is he still doing this carb service?
thanks
duncan
You can contact http://www.oldwings.com/
Thank you