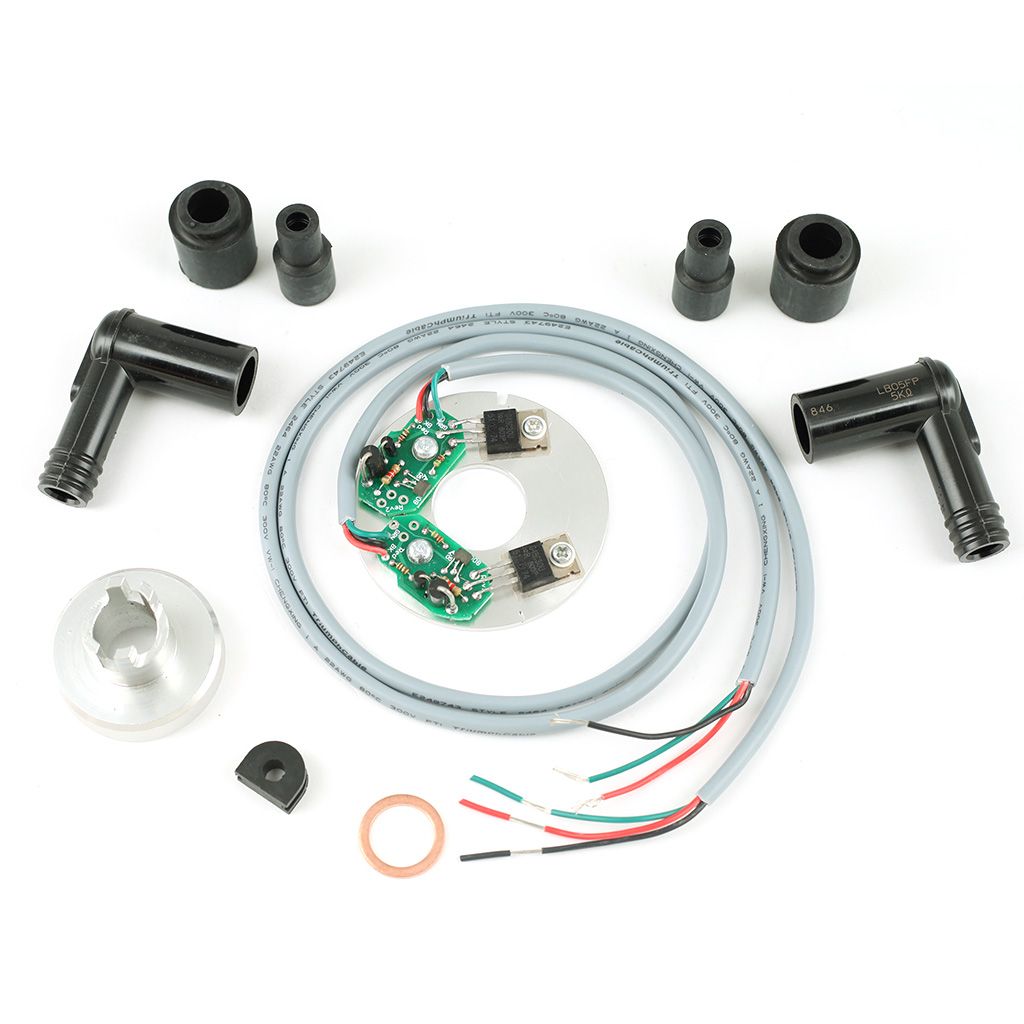
The XSCharge Electronic Ignition System is a direct replacement for the points plate and points cam system on a Yamaha XS400. This is an all-inclusive kit that comes with rotor, grommet, copper spacer washer, and spark plug caps.
Caution:
• Do not apply power until the installation is complete.
• Do not apply power unless both spark plugs are connected.
• Do not test for spark with one or both plugs disconnected.
• Do not disconnect the battery with the engine running.
• Ensure that the battery cable connections are secure.
• Do not leave the ignition on when the engine is not running.
Installation
- Remove the gas tank, point cover and left-hand side cover.
- Remove spark plugs to ease crankshaft rotation.
- Disconnect point wires from ignition coils and remove the condensers.

4. Rotate the crankshaft to the “LT” mark on the rotor to the compression stroke. The left-hand intake and exhaust valves will have clearance.

5. Remove the advance mechanism hold down bolt. Notice the 3 scribe marks aligned with the left-hand contact point.

6. Remove the contact breaker plate.

7. Observe camshaft locating pin for point advancer at 12 o’clock.

8. Remove the inner contact point lobe from the advance assembly.
This part will NOT be required for the XSCharge Ignition.

9. Install the advance mechanism to the camshaft and rotate to ensure
alignment to the pin on the camshaft.

10. Install the XSCharge backing plate with the scribe mark at the 12 o’clock position.

11. Install the XSCharge rotor onto the advance mechanism.
The designated indicator is shown at 12 o’clock position.

12. Install the copper spacer ring, the 6mm rotor and the advance mechanism fastener.
Torque Value = 90 in/lb
Now, check to see if the rotor turns freely and springs back to position when released.

13. Connect the sensor wires to the left-hand and right-hand ignition coils.
- Thread both cables through the rubber insulator and push into the notch.
- Connect both red wires to the common power connection on the coils.
- Connect the green wire from the BOTTOM PC Board to the left-hand cylinder ignition coil.
- Connect the green wire from the UPPER PC board to the right-hand cylinder ignition coil.
- Connect the black wire to a frame ground.

Timing Instructions
- Connect a timing light to the left-hand cylinder spark plug wire.
- Start your engine and observe the left-hand timing mark on the alternator rotor.
If the timing mark is NOT at the firing point mark, loosen the mounting screws on the ignition plate and rotate CLOCKWISE TO ADVANCE or COUNTERCLOCKWISE TO RETARD THE TIMING.
3. Increase the engine speed to 3,000 RPM and observe that the timing MARK moves to the advanced position.
4. Tighten the mounting screws on the ignition plate, then replace the point cover and alternator cover.

Under normal circumstances, you should not have to adjust or reset the timing. However, after the initial installation, you should check the timing after a few hundred miles. Periodic maintenance of the advancer is still required.
You have now installed your XSCharge XS400 Electronic Ignition.
For tech support, contact mailto:customerservice@randakks.com


Super opis . Gdzie mogę kupić taki zestaw zapłonowy ?