Here’s some information on spark plugs which old farts probably know, but young whippersnappers might not have seen before.

Spark Plug Removal:
The combination of aluminum cylinder heads and steel threaded spark plugs is inherently dangerous. The problem is differential rates of expansion and contraction versus temperature for these two metals. The aluminum head cools and therefore shrinks faster than the steel plugs. When these forces are at odds, you get serious clamping forces on the spark plug threads. So even though you didn’t over-torque them upon installation, you can easily strip the threads in the soft aluminum head if you remove your plugs carelessly.
Skipping the theory, there are two permissible conditions when it ‘s OK to remove spark plugs on a GL1000 (or any modern engine for that matter):
- When the engine is stone cold…as in overnight cold
- When the engine is at full normal operating temperature and has just been shut off.
Any other situation puts you at risk!
Spark Plug Installation:
Equally dire things can happen when installing plugs. The problem you’re trying to avoid here is cross threading. To avoid this disaster, always screw the plugs into the head by hand until you’re absolutely sure they’re threaded correctly. Once correctly started, I use a small palm ratchet on a short extension to screw them all the way in …just to the point where the gasket just begins to offer resistance. Then I switch to a standard ratchet for final torquing. Here’s how to set the torque accurately without a torque wrench:
- If the plug has never been installed before, turn an additional 1/4 turn once the gasket seats.
- If you are reinstalling a plug that has been previously installed, turn an additional 1/8 turn once the gasket seats.
I recommend against the use of any anti-seize lubricant on spark plug threads. I install them “dry” and clean. Neither Honda nor NGK recommends anti-seize because it affects torque values. Also, NGK plugs (and many other brands as well) have a special trivalent plating on the threads for corrosion resistance and also to act as a “release agent” during plug removal.
More spark plug tips from NGK here.
Spark Plug “Indexing”:
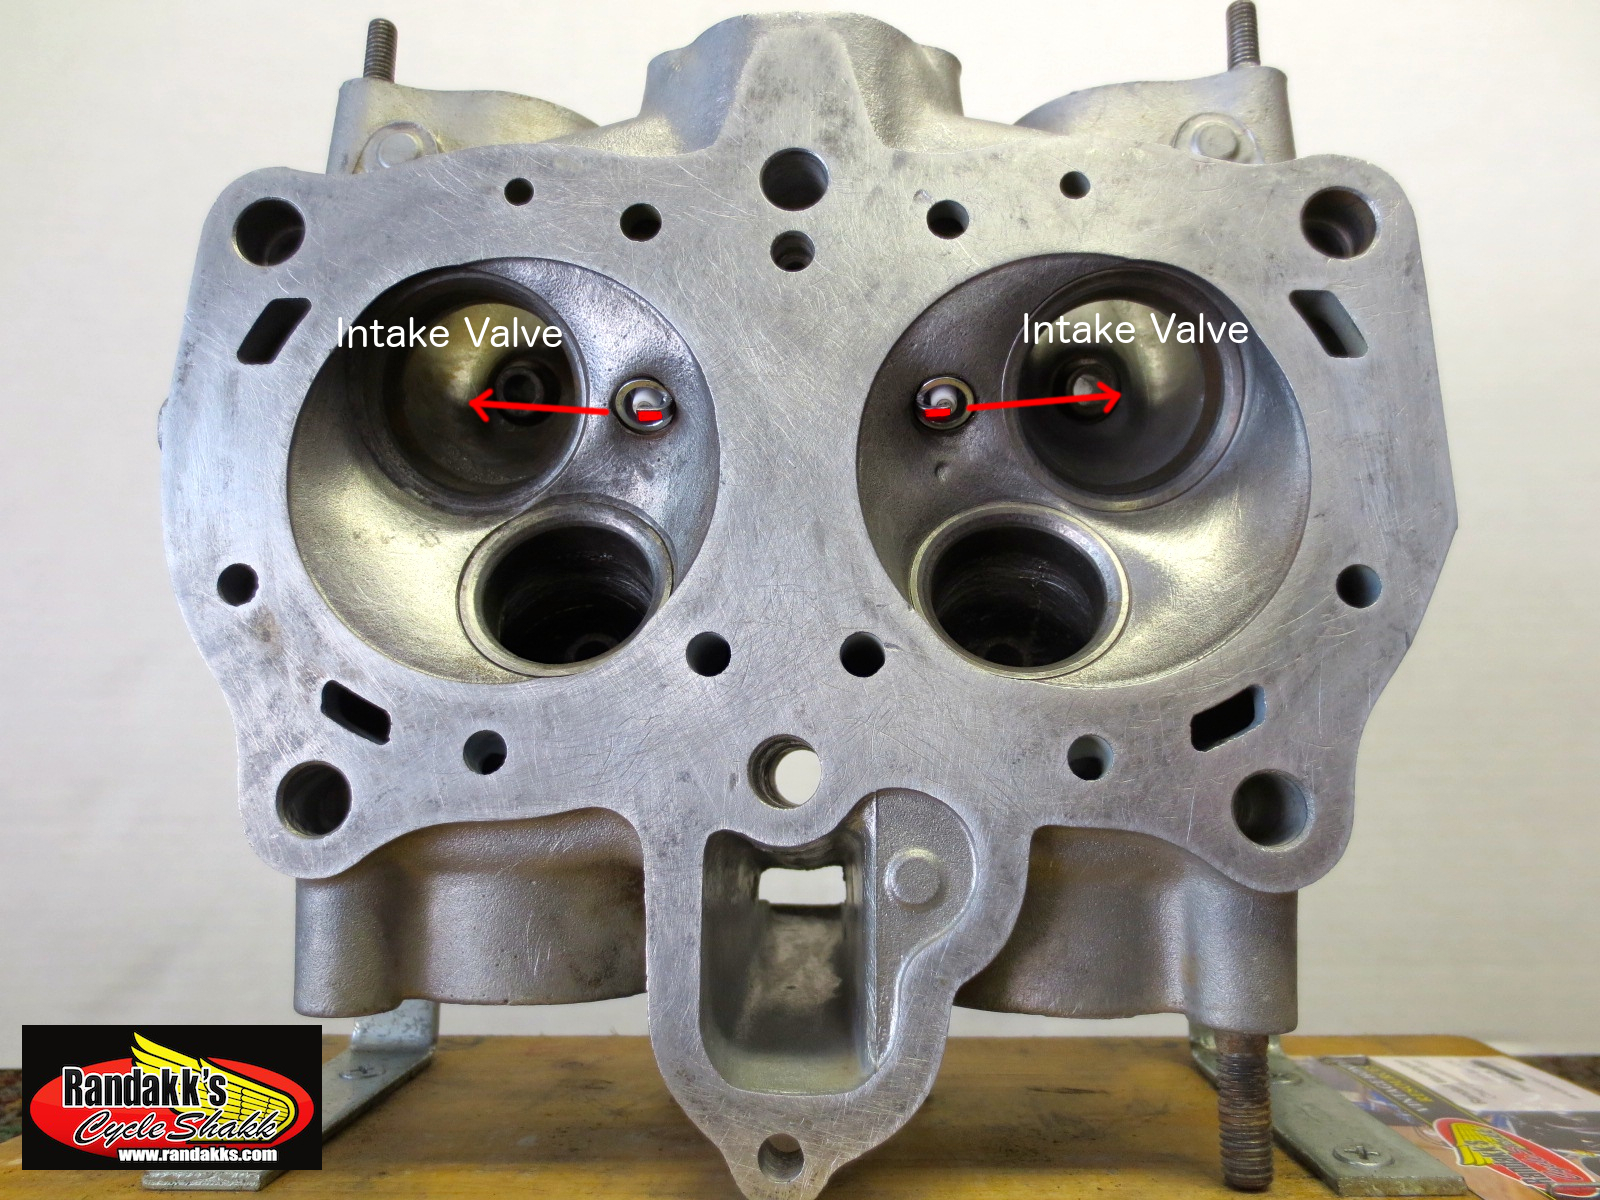
Here’s an old racer’s trick guaranteed for a slight fractional increase in horsepower. Grab a handful of new plugs that have been gapped and are ready for installation. With a Sharpie, place a mark on each plug (on the porcelain part) opposite the point where the side electrode attaches to the spark plug tip. Now (through trial and error) experiment with different plugs in each cylinder until you find one which will orient the mark you made on the plug as close as possible in the direction of the intake valve / intake runner when correctly torqued. Note: don’t set the final torque now…just estimate the final position based upon where the mark would be if you added another 1/4 turn (for new plugs).

Unless you’re very lucky, you may have to go through a dozen plugs to get a good match for each cylinder. Perfection is not necessary. What you’re trying to do is orient the plug so that the intake charge filling the cylinder can “see” the spark gap directly and is not shielded in any way by the shadow of the side electrode attachment point. This promotes fast and complete flame propagation that yields maximum power.
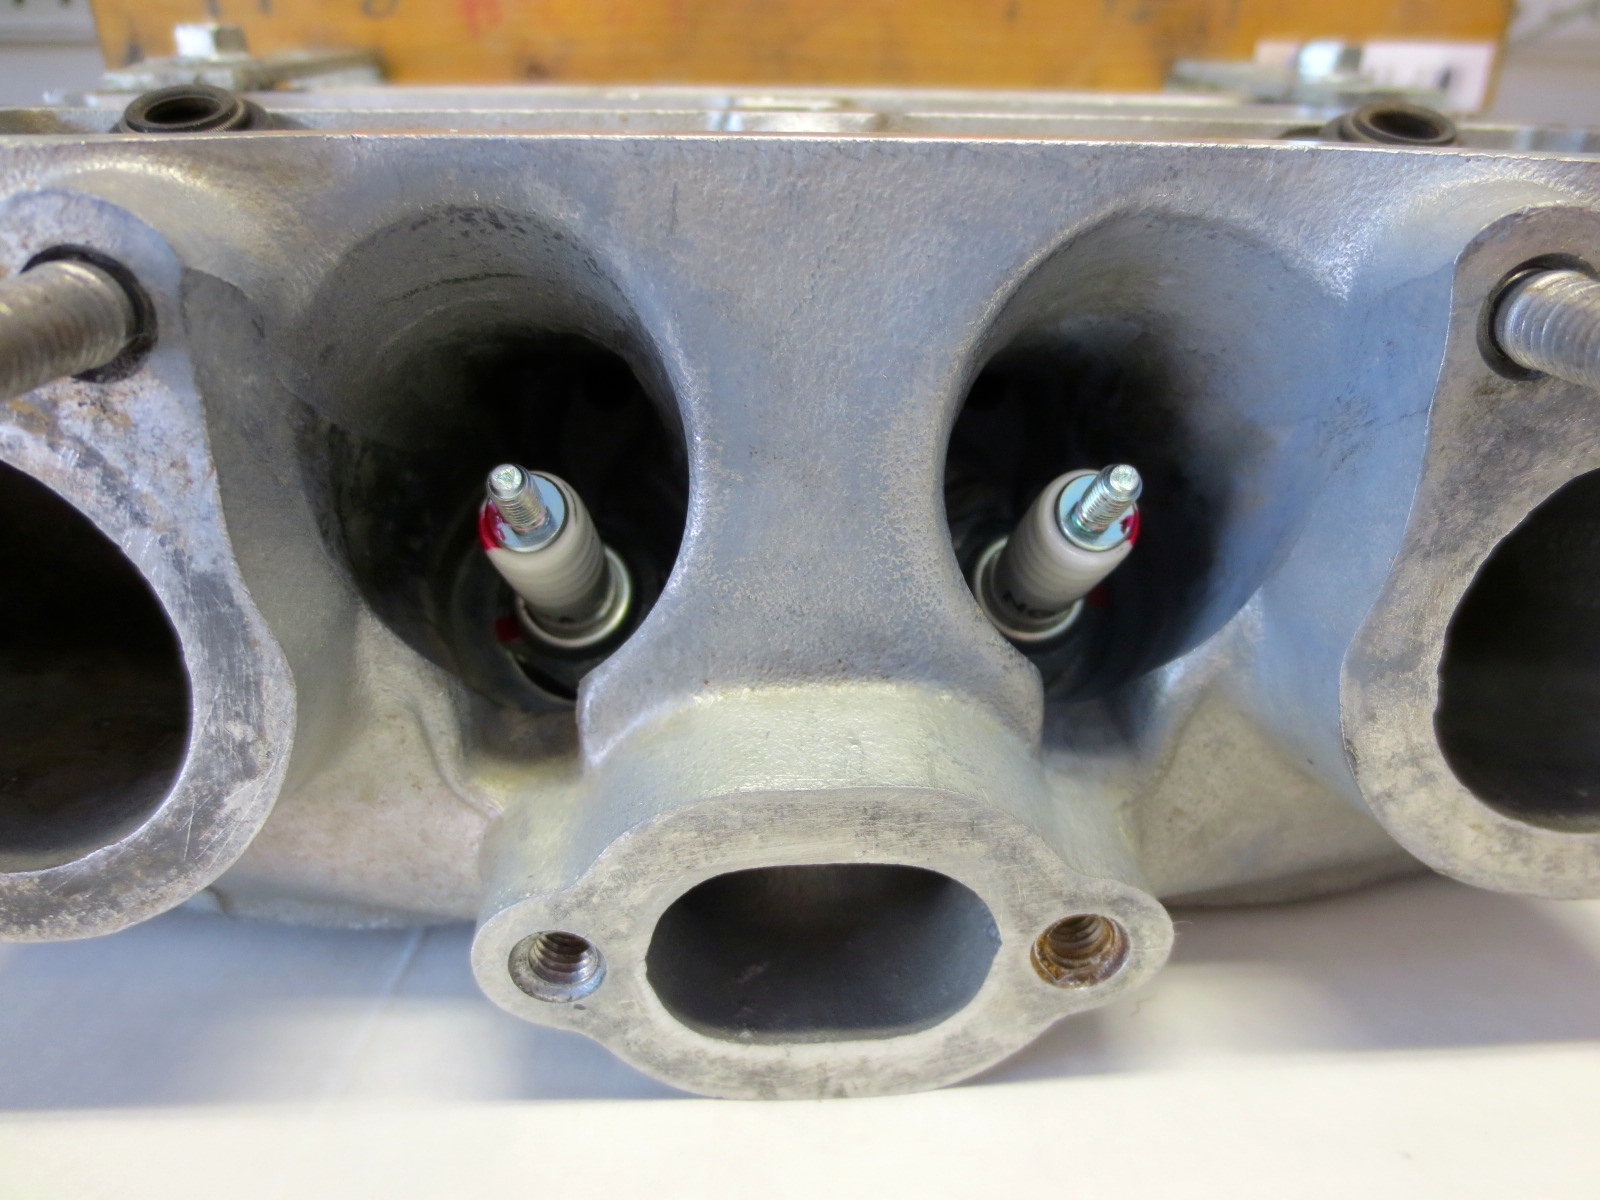
This is tedious and time consuming, but I always take the time to do this for my own bikes. Once you’ve indexed the plugs, you’re set for the life of the plugs. Just make sure you always replace the plugs back into the same cylinder whenever you remove them for maintenance. I’ve seen this trick make a noticeable difference in bikes with slight plug fouling problems and slight idle roughness. Recommended!
Spark Plug “End-Gapping” (aka “Side-Gapping):
Here’s another racer’s trick worth knowing. This is basically a poor man’s “Split-fire.” By the way, I don’t recommend Split-fire spark plugs. Their design concept has slight merit; however, they seem to have serious manufacturing and quality control issues. Splitfires are the only brand I’ve ever seen disintegrate into multiple pieces during normal use.
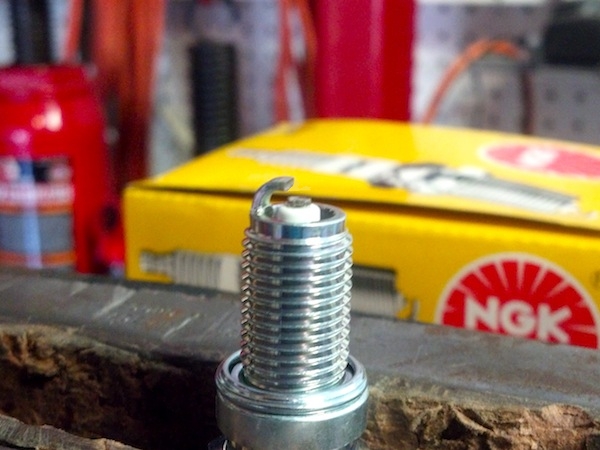
“End Gapping” is a very simple idea and best of all it’s free. It just takes a few minutes of your time to execute. What you do is lop off the last little bit of the side electrode so that the end now bisects the midpoint of the center electrode. I use a DREMEL cut-off disk to accomplish this surgery and dress up the electrode after making the cut with an ignition file. Make sure to re-gap after making the cut.
“Side-Gapping” is a slight variation on this same general idea. In this case, you cut off a bit more of the side electrode so there is full exposure of the center electrode. The modified plugs look like this:
Again the theory here is to present the spark directly to the incoming fuel/air charge without any impediment from the side electrode.
The only down side of this trick is that your plug life will be reduced because you won’t have as much available range to adjust the gap to compensate for wear.
Heat Range Selection:
For 99% of rider’s, the recommended spark plug heat range is best. For the GL1000, this is the ubiquitous NGK D8EA plug. Honda and spark plug engineers collaborate to pick the optimal recommended spark plug heat value. Modern spark plugs accommodate a very wide range of operating conditions.
Deviation from the recommended heat value is not advised unless:
- the engine’s ability to generate heat or combustion pressure has been altered through extensive engine performance mods (not likely with early Wings).
- the bike is operated at wide-open throttle for extended periods (not likely with early Wings)
- the bike is operated at “parade” speeds for extended periods (never recommended for early Wings)
Deviation from the recommended heat value can result in catastrophic spark plug failure which can ruin an engine. You’re never at risk for this with the factory recommended spark plug.
Spark Plug Selection:
The only real spark plug “improvement” worth considering for most riders is to upgrade to premium plugs like platinum or iridium (in the recommended heat range). These have a greater ability to resist fouling, have longer service life with less gap maintenance and have the performance advantage of “end-gaps.”
 NGK DR8EIX Iridium Plugs
Important Resistance Issues:
There should always be some resistance in the high-voltage, secondary side of the coil circuits (spark plug wire side): either a resistor plug, a resistor spark plug cap, or resistor spark plug wires.
You always need at least one of these elements. Otherwise, the coil discharge will be too rapid, resulting in shorter, less useful spark. This will also risk overheating the coils and reduce their life expectancy.
Using any two of these forms of resistance is probably OK if you are overly concerned about radio static and interference, but you should avoid using all three forms of resistance at once. That will hurt performance…especially at higher RPMs.
For example: the NGK DR8EIX iridium plug recommended for the GL1000 is indeed a resistor plug (hence the “R” in the code). If you run this plug, you should pair it with aftermarket ignition wires / caps of the nonresistance type. If you stick with the OEM wires and NGK caps, you should eliminate the removable resistor in the cap when running any resistor-type spark plug (see how below).
Spark Plug Caps:
Check each OEM-style spark plug cap for resistance. The correct value is 5K ohms.

Correct orientation of the screw retainer, resistor, and spring
For maximum ignition performance when running resistor-type plugs (like modern Iridiums), you should eliminate the NGK cap resistor altogether. Here’s an easy way to do that. Get a handful of suitably-sized brass machine screws that have the same OD as the resistor – about 5mm (SAE-sized #10-24 or #10-32 brass machine screws also have the right diameter and are available at any hardware store). Then, cut sections of these brass machine screws to the same length as the resistor you are removing (about 18mm). This makes an excellent resistor substitute and you don’t have to worry about the interaction of dissimilar metals.
Spark Plug Gap Deviation:
Finally, if you’ve upgraded to an electronic ignition (like Dyna-S) AND have aftermarket 3-ohm coils like Accel or Dyna – the spark plug gap should be increased to .032″ – .035″ to take full advantage of the ignition improvements you’ve invested in.
Special Note to Restorers:
The Honda-specified spark plug for the GL1000 is the NGK D8EA plug. However, when the first GL1000s were introduced, the specified plug was NGK D8ES–L. The “S” designation indicates that it was a “special” design and the “-L” designation means the heat range is a half step “cooler” than the norm for D8EA plugs.
Honda recommended the D8ES-L for all of the 750/4’s from 1969 through 1977, the CB350F, CB400F, and the GL1000 through 1977 were also included. Other Japanese manufacturers used them as well.
NGK D8ES–L Plugs – for highest level restorations
If you want to find the best selection online for motorcycle parts, visit our stores below:
www.DimeCityCycles.com | www.Z1Enterprises.com | www.Randakks.com | www.MikesXS.net


Dear Sir , i am a retired 66yr old honda mechanic. Do not under any sircumstances use Champion plugs in any honda 4 stroke , except where the manuafactures did fit it originaly ..ie honda,s 2 stroke 250cc dirt bike with chrome bore made in the very late 1970,s early 1980,s it had a genuene champion plug .As for all rest stick with ngk, nippon denso . but never ever champion why because champion are 1 range hotter than all other plugs .I have seen first a number of pistons with burnt holes in the top ,from too hotter plugs being fitted to honda motor cycles. All other brands are ok , AC , KLG etc.. The Champion cross referance is 1 range hotter . regardes Eugene Curtis.Australia
Hello, I have a 79 gl000 that after a couple of years I feel I finally worked most of the gremlins out of. I now have a Dyna ignition and coils with mostly new electronics. I recently did the “end gapping” recommended in this article. It worked so well I was able to turn my fuel mixture screw out an additional 1/4 turn and the throttle is even more responsive than before. My question is : if I go with Iridium Plugs, can I or should I still do the end / side gapping thing?
Thanks for your time and all the wonderful advice in this site.
I am going with a Dyna electronic ignition for my GL1000, plus Dyna 3 ohm voltage coils, and the Dyna spark plug wires. With this setup, do I need to use any resistors?
Answer here:
http://www.randakksblog.com/ballast-resistors-explained-ballast-testing-procedure/
(Chart at the bottom of that page.)
My 120 degree NGK caps don’t have a slotted plug that can be easily removed. Yet no-one seems to make 120 (or 45) degree non-resistor caps. Any advice?
Hi Randakk, great info here. I’m running a 1978 Honda XL350. The owners handbook states the correct plug as the NGK D8ESL, but then goes on to say if running WOT in warm countries use a D8ES for cooler running.
Given that the L in the D8ESL means it’s running half a step cooler, isn’t this info incorrect?
I’m doing a 10 country tour on the bike in June. On a recent trip to Wales I encountered pinking when it got hot so would like to run cooler. I would also like to run Iridium. Could you make any suggestions? Thank you.
I would ask that question directly to NGK technical support. I agree there may be some confusion.
Thanks Randakk, I just did exactly that and got instant definitive info.
The Tech guy admitted the info was misleading, that the D8ESL would be a hotter plug than the D8ESL, and would in todays terms be a D9ESL.
The cooler NGK Irridium I was looking for exists as a DR9EIX,
Good deal. If you will be running those DR9EIX Iridium plugs (which have built-in suppression resistance), you should remove the suppression resistors in the standard NGK Plug caps. Replace with a straight section of suitable stiff copper.
Randall,
Great site, thank you for all of the great information. I have one question about sourcing points etc. Would the kits supplied by Saber-Cycle be considered good quality. I too want to continue with the points on my 76, but unsure about where to source parts from. Here’s the kit I’m referring to:
http://www.saber-cycle.com/store/product303.html
Thank you again for all of the great information.
I do not have any first-hand experience with that competitor’s product.
I use and recommend only OEM Honda contact breaker point sets. I have found the quality to be superior compared to aftermarket products.
Thanks.
Hi, I would like to know if champion A6 are correct alternative to NGK D8EA.
Thanks
No. Use the recommended NGK D8EA plug.
Good evening Randakk,
I appreciate your insight and have read much of your writing – thank you for sharing your wisdom. I have installed an accel coil, but retained the original points. What plug gap do you recommend with that combination? Is it still the .032″ – .035″ or something else?
Thanks!
Nathan
With that combination, go with the OEM Honda spec for breaker gap.
Hello,
I’m trying to resurrect my 1983 Interstate. I found a bad plug wire and decided to replace all of the wires and caps with new ones. After putting on lots of miles on the web, I am having trouble finding manufactured replacement wires or where to buy all parts necessary to make my own. Have you ever come across any information on building new wires and caps or do you know of a supplier that might have manufactured replacement? I have been through NGK, ACCEL, E-Bay, Kijiji and various vendors and can’t find a lot of info.
Any help you could pass along would be greatly appreciated.
Thank you,
Ken Wilkinson
Ken:
Simply reuse the terminals and spark plug caps and use Packard 440 Copper Core 7 mm Spark Plug Wire which is widely available from numerous sources.
Dyna also sells 7mm copper core wire.