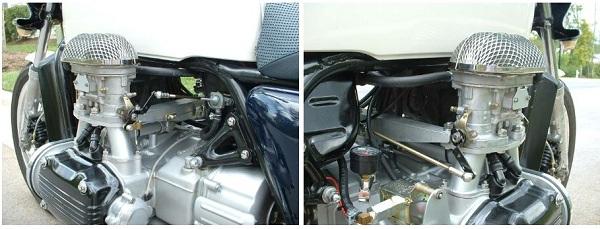
As installed and tested on RC003
The ultimate carb conversion for GL1000/GL1100. Dual Weber 40IDFs…the world’s most tunable performance carbs!
Special thanks to Don Luther. Don has had his dual Weber-equipped GL1000 on the road for many years. His bike – “Wang Thang” was the inspiration for this project. Don provided much early guidance on this project. Thanks also to “NiteMare” Pete and “Frenchy” for assistance. Also, Greg Foresi provided invaluable assistance in working out the rather complex math for optimizing the throttle linkage angles for the contra-rotating throttle shafts. These are essentially a “Scotch Yoke” mechanism that translate a sinusoidal motion to a linear motion.
You will need to source your own Weber carbs elsewhere (they are easy to find) along with all the other bits needed to complete the conversion.
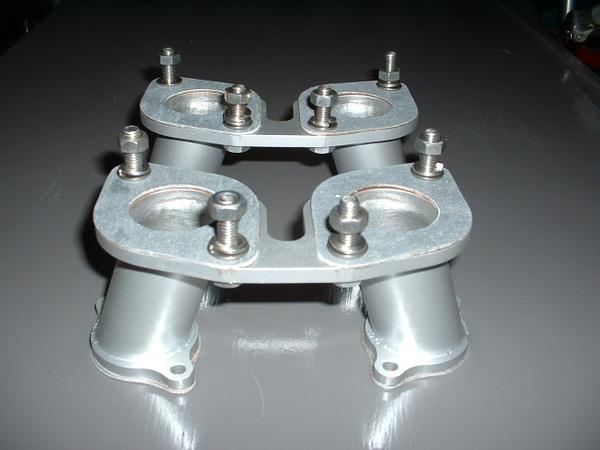
Shown painted with high-temp engine enamel (gaskets and hardware not included)

Shown with customer-sourced chrome plating (not included). Thanks to James Jeffrey – Paris, France for photo.

Shown with customer-sourced semi-gloss black powder coat finish (not included). Thanks to Attila Baraczka – Toronto, Canada for photo.
Air Filter Options
Details on sourcing two different air filter assembly options are provided:
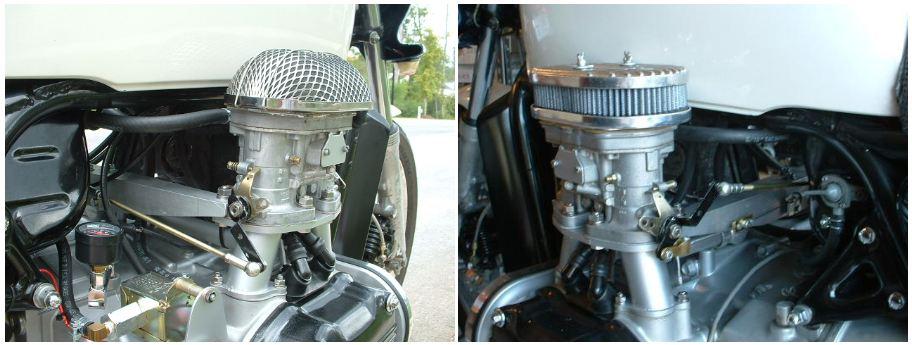
Filter on left can be used without modification… Filter on right requires slight modification (filter assemblies are not included)
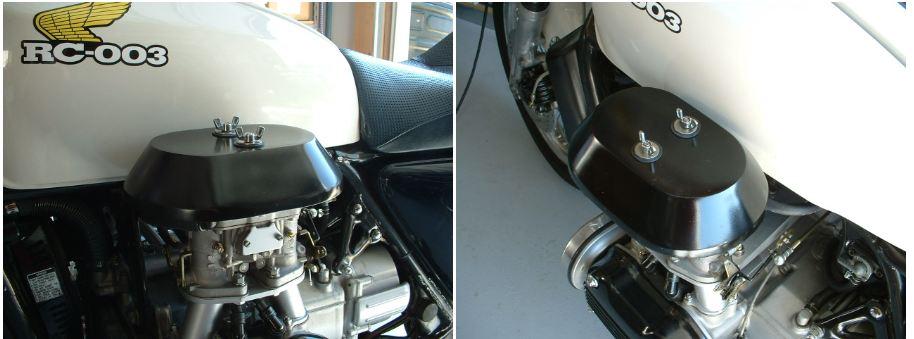
“Rain Hats” improve weather protection (plans to source and mount these are provided)
Performance Data
Top gear 60-80 roll-on times were decreased by 0.4 seconds average. This is a good measure of overall power and tune …much safer and gentler than 1/4 mile runs from standing start. Based on my on-the-road testing and the roll-on numbers, I predicted that I would find 5-8 additional max horsepower on the planned dyno tests. I also didn’t notice any low speed loss of torque even thought the straight intake runners are rather short.
Dyno Results
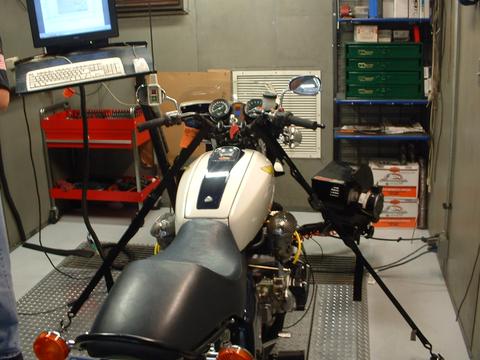
On October 12-13, 2006 dyno runs were conducted at Ray Price Harley-Davidson in Raleigh, NC. Ray Price has one of the top dyno rooms in the country. No surprise, since Ray Price himself is one of the best Top Fuel drag racers in the country.
Jason Clement and Bruce Downs of Ray Price Harley conducted these tests.
Here are the dyno results for the Dual Weber set-up:
Max Horsepower: +8.25 horsepower gained! (+13.8%)
Max Torque: +3.04 foot-pounds of torque gained! (+6.2%)
All these results are relative to the very excellent set of stock GL1000 carbs in razor sharp tune previously on the test bike (RC003). The OEM Honda carbs were essentially stock. We’d previously implemented the “off idle” fix and also balanced the CV slides to within 0.1 gram each on the stock carbs. They were perfectly synchronized.
As predicted, there was no decrease in torque at any point across the rpm range with the Webers.
Keep in mind that dynos are notoriously variable from one to the next. Absolute values are not very meaningful…only comparative runs on the same dyno will tell you much. Honda was shy about publishing horsepower results for the GL1000, but most magazines at the time pegged it at about 80 hp at the crank. Keep it mind that on a shaft drive bike, parasitic losses in the drive train result in 20-25% loss of horsepower from the crank to the back wheel.
If you look at the charts, both set-ups show torque curves that are VERY FLAT and horsepower curve that are VERY LINEAR. This explains the great road manners for a well-tuned GL1000 with excellent-performing OEM carbs. I’m very impressed with the results that the Honda engineers came up with on this engine / carb combination!
Air/ Fuel mixtures for both setups were very consistent and near-optimal across the entire rpm range as well.
The Weber setup showed dramatic improvement across the entire rpm range in both torque and horsepower. Interestingly, there is an especially significant positive improvement in torque on the Weber setup from 3,000 – 4,000…the spot were most cruising is done. This “sweet spot” explains part of the very satisfying seat-of-the-pants boost you can feel with this setup.
Needless to say, we’re thrilled with these results.
Pros
- This is the ultimate performance carburetion setup for the GL1000/GL1100. The only other paths to more power would be the expense, complication, weight and heat generation involved with superchargers, turbochargers or internal engine modifications.
- This setup is approximately 7 pounds lighter than the OEM carb setup!
- Very short, isolated intake runner design ensures that each cylinder is tuned the same.
- Carb icing will not be an issue!
- Low fuel mass to move upon throttle demand for great throttle response.
- Maximum tuning flexibility. Webers are the ultimate carb for precise tuning! All jets can be swapped in seconds without carb removal or disassembly.
- Ease of maintenance. These are very simple and easy to maintain carbs. Floats can be adjusted without carb removal. Parts are readily available worldwide. Orifices are much larger on the idle circuits compared to the OEM carbs, so there is less chance of blocked idle circuits.
- Superior float design for excellent fuel control.
- Better engineered low speed circuits permit very precise idle regulation and a slightly lower curb idle speed.
- Superior progression circuit design provides instant off-idle response.
- Accelerator pumps provide excellent transition under hard acceleration.
- No choke mechanism required. Accelerator pumps make excellent cold start priming device.
- Removal of stock carbs and airbox frees up considerable “real estate” under the glove box. Hmmm…we think a nitrous oxide bottle might fit there.
Cons
- Not recommended for most GL1000 / GL1100 owners. Most owners would be well-advised to retain their OEM carbs to maximize future resale value. This is especially true if you have a high value collector quality machine. Most future collectors will not be overly impressed with this setup. OEM carbs are stellar performers unsurpassed by alternative carburetion set-ups…other than this dual Weber configuration.
- These manifolds are intended for off-road or competition use only. They are not legal for on-road use in many jurisdictions. Suitability and compliance to local laws is your responsibility.
- This is not a “plug and play kit.” Only a pair of manifolds, installation tips, material lists, supplier contacts and baseline jetting recommendations included. Even though we’ve done the hardest part for you, you will still need considerable mechanical ability to select, overhaul, re-jet and install the carbs that you source. You will need to be able to fabricate an accurate, reliable and safe throttle linkage -without slop! Poor throttle linkage will doom your project!
- Baseline jetting recommendations will give you a great starting point, but you may need to refine based upon other variables such as air cleaner and exhaust specifics as well as altitude. You will need some tuning expertise.
- Baseline jetting recommendations are calibrated for GL1000 models. GL1100 jetting should be very close, but you will need to determine your own calibrations starting from our baseline suggestions.
- The air intake roar from this setup is a bit loud! It sounds absolutely wonderful…reminiscent of a Ferrari Dino! Your neighbors will probably not agree.
- This is a fair-weather setup. It is not intended for extended use in heavy rain. Not included: details on installing rain hats to improve weather protection (shown above). Rain hats also muffle the intake roar somewhat to more socially acceptable levels.
- Fit on later “non-naked” bikes with factory fairings has not been verified. Some interference with the fairing would be expected.
- Spark plug maintenance is a pain if you retain the OEM plug wires/caps. I strongly recommend you upgrade to aftermarket coils, wires and caps. Use straight plug caps. Accel and Dyna make excellent high performance coils and wire sets for early wings. Make sure you get coils compatible with your ignition system.
- Top shelter covers can’t be pivoted down per normal practice as the carbs placement interferes. Solution: remove the top shelter cover lower pivot pins. Then the top shelter covers can be secured with just the large black knobs. The covers can be lifted out vertically for easy maintenance. Be sure to secure the top shelter hinge bushings with RTV adhesive or they will be lost. They still need to be in place so that the top shelter covers are positively located.
- These are not constant velocity (CV) carbs like the OEM units. CV carbs have ingenious mechanical logic built into them that meters air/fuel mixture substantially in response to actual engine load regardless of ham-fisted throttle inputs from the rider. These non-CV Weber carbs take a bit of subtle throttle hand retraining for best results. Once you get accustomed to the instant throttle response, you’ll like it a lot.
- Riders taller than about 6′ 2″ tall may have clearance issues with their left knee. I’m 5′ 11″ and have no clearance issues.
- Manifolds have been bead blasted and coated with rust preventative oil after fabrication. Since they are made of steel, you will need to paint, chrome or powder coat them to avoid corrosion. Minor surface rusting may occur during storage and transit.
- A healthy clutch is mandatory to handle the power output.
Advice on Selecting Carburetors
- Weber 40IDF is the recommended carb. Model number is stamped on the lower carb flange.
- Weber 40IDF Model 70 is the preferred model. This model is widely used on VWs and Porsche 356/912s. It should have jetting from the factory close to what you need.
- Weber 40IDF carbs with adjustable accelerator pumps are strongly recommended for this application.
- Be aware that previous owner of your carbs probably made jetting changes, so verify your actual current jets, etc. before ordering additional jets or other calibrated parts.
- Weber 36IDFs will work, but these carbs are not widely available in the US. 36IDFs are fine so long as the venturis are 28mm. Depending on the model car they were originally destined for, there may be some non-adjustable idle air bleed jets which are not correctly sized for this application. If yours are wrong, they can be soldered shut and redrilled to the correct size. Be sure the passages behind the left /right balance adjustment are clear. They are “sealed” and hard to access on some 36IDFs (unlike 40IDFs) Ray Proebstl of Munich, Bavaria, Germany recently went through this install with Weber 36IDFs and he was able overcome these quirks.
- Weber 44IDFs or 48IDFs should be avoided – they will not be close to the calibration you need and will most likely have main venturis that are too large.
- Verify that the carbs have 28mm main venturis before your purchase. These can be changed if necessary, but it is an unnecessary hassle and expense. Venturi size is stamped and visible on the top, inner surface of the venturi near the outlet for the accelerator pump nozzle.
- Dellorto downdraft carbs are compatible with these manifolds but have not been tested. Downdraft Dellorto 36 is generally equivalent to Weber IDF40.
I won’t be publishing the jetting specs. That research and testing was very time consuming and expensive and is part of the “value add.” You would faint if you saw the bill for the first prototype and creation of all the necessary tooling to produce these!
Remember: Carbs, linkage, air cleaners, etc. are not included.
My price includes only the pair of manifolds plus a comprehensive installation guide (45+ pages) which includes step-by-step instructions, dimensional drawings, close-up photos, material lists, supplier contacts and jetting specs. I also include a set of Viton O-rings to mount the manifolds to the cylinder heads.
Considerable skill is required to install these manifolds correctly. Since I can’t control this important variable, there is no warranty on these. Rest assured that they are of the highest quality materials and workmanship.
You will need considerable mechanical ability to select, overhaul, re-jet and install the carbs that you source. You will need to be able to fabricate an accurate, reliable and safe throttle linkage – without slop! Poor throttle linkage will doom your project!
Note: In the interest of creating a bit of turbulence to aid even fuel mixtures, the transitions inside these intakes have not been overly finished or polished. This intentional “roughness” is beneficial and should not be polished out.
Note: DO NOT BUY THESE MANIFOLDS IF YOU EXPECT PERFECT TRANSITIONS TO THE INTAKE PORTS “OUT OF THE BOX.” Be prepared to do your own “porting” work if you require perfect transitions.
Note: The welding on these manifolds will be functional, but may not approach the artistic quality as shown on the samples above. Quality of the welding depends on the individual skill of the welder selected by my fabricator for each batch.
Note: These Weber manifolds are not marketed for GL1200s even though they bolt up fine. The problem is GL1200 heads have much smaller ports, so that creates a “step” that adversely affects flow. Some customers have overcome this by installing machined “transition” spacers between these manifolds and the GL1200 cylinder heads. A better path is to put GL1000 heads (’75-’77 preferred) onto the GL1200 engine. That gives you hotter cams, better breathing combined with the larger displacement engine and results in a very powerful combination. It usually means converting to a GL1000-style ignition driven off the left cam in the usual GL1000 fashion.
GEN II improvements include OEM-sized O-ring grooves where the intakes mate to the cylinder heads. A set of Viton intake o-rings now included with each order.
Note: The supplied Instructions (45+ pages) are proprietary intellectual property and are protected by copyright laws. The photographs, text, baseline jetting specs and other content may not be copied, reproduced, distributed, stored, or manipulated in any manner.
To read more reviews on this and other products visit our Review Site, https://www.randakksreviews.com


Hello randakksblog.com owner, Your posts are always well-written and easy to understand.